How to make auto-skinning apps for your theme
THIS ONLY SKINS APP-STORE ICONS & INSTALLOUS ICONS ONLY !!! Cydia apps have to be manually skinned… essentially, if you press and hold down an icon (like youre going to move or delete it from your springboard), all the app icons that jiggle around with the “x” box allowing you to delete them ARE APP-STORE APPS – those will skin with your mask and shadow… all the ones that jiggle and DONT show the “x” box to delete are native or cydia apps – those you have to manually create.
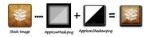
There are three files that the iPhone and iTouch use to skin app-store icons (located in ios3 theme folder “UIImages”) – the AppIconMask.png, AppIconShadow.png and AppIconOverlay.png:
[IMAGE 1]
[You dont need the “AppIconOverlay.png”
But it doesnt hurt to have it] aslong as you have the mask and shadow.
AppIconMask.png
AppIconMask
AppIconShadow.png
AppIconShadow@2x.png
AppIconOverlay.png
AppIconOverlay@2x.png
You want to have these files in the “UIImages” folder
[IMAGE 2]
and in the “Bundles” folder inside a folder called “com.apple.mobileicons.framework”
[IMAGE 3]
[IMAGE 4]
the AppIconMask and AppIconShadow need to be in the themes “UIImages” folder
For ios4, put both the mask and shadow pngs in the “com.apple.mobileicons.framework” folder thats inside the themes “Bundles” folder. If there is no “com.apple.mobileicons.framework” folder in bundles you must manually create a new folder named And this is VERY important – as for everything else in your theme, the file names MUST BE CASE SENSATIVE and match the exact spelling as the stock iphone theme mask and shadow files. Make sure you have them named as ->
“AppIconMask.png”
“AppIconMask”
“AppIconShadow.png”
“AppIconShadow”
– they must be spelled exactly how I just labeled them. This nuance can be said for all files in a custom theme – when in doubt tap into the stock theme and make sure your custom images have the exact same spelling with upper-case and lower-case, just like the stock theme has them labeled
Ive added a couple helpful images below
[IMAGE 5]
[IMAGE 6]
VERY IMPORTANT – IF YOU HAVE MADE YOUR OWN ICONS, MASKS OR SHADOWS, MAKE SURE YOUR CANVAS SIZE FOR BOTH THE MASK AND SHADOW IS 59×60 PIXELS (118×120 for Retina iP4) – NO BIGGER, NO SMALLER… APP STORE ICONS ARE THIS EXACT SIZE AND AUTO-SKINNING WONT WORK IF YOU DEVIATE
You apply all the effects to the AppIconMask.png and AppIconShadow.png. The MASK is used mainly for the icon graphic and the shadow effects on top of the graphic. The effects are achieved by using the color BLACK to HIDE any desired area of the graphic that you DO NOT want to show – notice in the illustrations how the outside edges of the mask are all black – that means that portion of the stock app store icon WONT show…. The color WHITE is just the opposite – its used to achieve transparency, so different shades of white can apply a wide range of desired over-effects – solid white means its 100% transparent in that area and the entire graphic image for that particular area WILL show.
The SHADOW allows you to apply the custom icon frame and some other minor effects to the icon, like using solid black or white to accentuate the shaded areas of the mask that you applied. Imagine that the shadow sits ON TOP of the Mask, and any area of the AppIconShadow.png that resides directly above the solid black areas of the AppIconMask.png will appear at 100% opacity on the final product. If you place any portion of the shadow over the white or gray areas of the mask however, youll notice the stock icon graphic will appear on that part of the shadow image you created.
-

- image11
-

- image21
-

- image31
-

- image4
-
- image5
-

- image6


